
We’ve heard the war stories from our fellow bioinformaticians and lab directors: waking up bleary-eyed in the middle of the night to check on the results of an NGS data analysis pipeline, converting files to different formats, setting up the next step of their downstream analysis, and groggily shifting back to bed.
Having gone through the same inane hassle, we understand the utility of a robust API that can automate manual tasks.
We’ve put together a powerful API for Python and command line, and made them as readable, simple, and intuitive as we could. Basepair’s UI is already streamlined for one-click, rapid-fire analysis, but when it comes to dozens, hundreds, even thousands of samples, nothing beats the addition of a solid API.
In this post we’ll go over a few examples of how our Python API helps automate NGS data analysis at scale. If you’d like to check out the command line API, we’ve written up a helpful post here. (To view our help documentation, you need to be signed in – if you don’t have an account, you can sign up for a free two-week trial in less than a minute using the button at the end of this post.)
Even if you’re not a bioinformatician, or don’t have developer experience, we recommend simply glancing at the examples below to get a sense of what you can do with Basepair’s API. Basepair can also help you set up the API and any integrations – you can contact us here for more information.
Getting started with the Basepair API
Once you’ve installed the Basepair Python library and setup the configuration file, make sure you’ve imported the basepair and json libraries, and connected basepair to your configuration file.
|
import basepair
bp = basepair.connect(json.load(open(‘/path/to/basepair.config.json’))) |
Now you’re ready to start automating your NGS data analysis.
Exploring your data
To explore data available on your account, use the bp.print_data() command.
| bp.print_data(‘genomes’) # Will return a list of all genomes # To get more detailed info per genome, add the json=True parameter
id name date_created
bp.print_data(‘workflows’) bp.print_data(‘samples’) bp.print_data(‘analyses’) bp.print_data(‘analysis’, uid=[17209]) |
Creating or deleting samples
Creating and deleting sample data is the bread and butter of Basepair’s Python API, and what allows you to programmatically add up to thousands of samples.
Let’s walk through an example and create some pair-end RNA-Seq data from the hg19 human genome. We add samples in the Python API by creating simple dictionaries. Here are the possible key-value pairs:
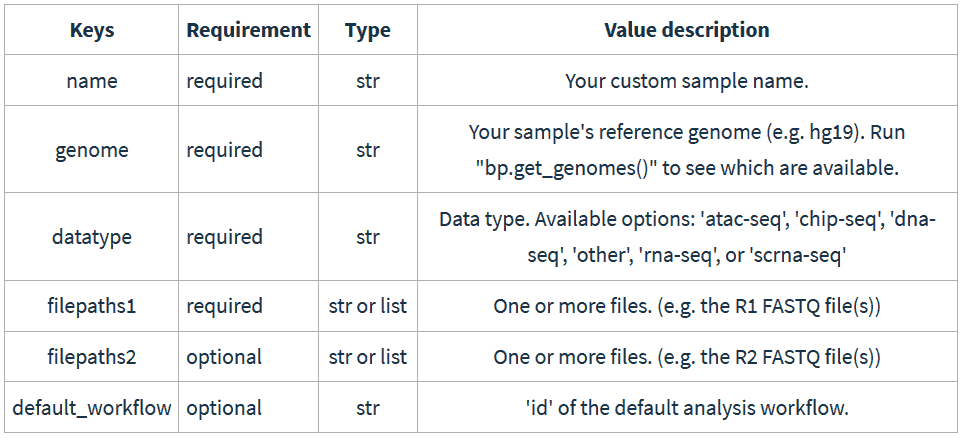
And here’s how this would look like in your IDE:
|
fwd_file = ‘reads_1.fq’ sample_info = { sample_id = bp.create_sample(sample_info) |
bp.create_sample() creates and uploads the sample – it’s that simple. If you’d like to create the sample without uploading the data to Basepair, use the upload=False parameter.
The sample_id variable gets assigned a unique integer ID. If you lose track of this number, you can always run bp.get_samples().
To delete your sample, simply run the following command:
| bp.delete_sample(sample_id) |
You will get a “” if the sample was deleted successfully.
Running the NGS data analysis
When you have your samples created and uploaded, it’s time to run the appropriate analyses!
First, run the bp.get_workflows() to get a list of workflow IDs, then use the chosen ID as a parameter for the bp.create_analysis() command. Below, we create an analysis to map and quantify the reads with STAR.
| bp.create_analysis(workflow_id=’4′, sample_id=’3206′) |
Next, we’ll download the results.
Downloading results
To get the uid of any of your completed analyses, recall that you can use the bp.get_samples() command. Once you have your uid(s), you have a lot of flexibility with what you can download:
| bp.download_analysis( 28626, tags=[[‘bam’]], tagkind=’diff’, outdir=’./test/’) |
What this code does:
- Downloads files from analysis with ID 28626.
- Excludes files tagged with “bam” (since tagkind is set to ‘diff’).
- Downloads all files to the “test” directory.
| bp.download_analysis( 28626, tags=[[‘fastqc’]], tagkind=’subset’, outdir=’./test/’) |
What this code does:
- Downloads files from analysis with ID 28626.
- Only includes files tagged with “fastqc”.
- Downloads all files to the “test” directory.
| bp.download_analysis( 28626, tags=[[‘rnaseq_metrics’,’json’],[‘fastqc’,’zip’]], tagkind=’exact’, outdir=’./test/’) |
What this code does:
- Downloads files from analysis with ID 28626.
- Only includes files that are tagged with either “rnaseq_metrics” and “json’” or files tagged with “fastqc” and “zip”.
- Downloads all files to the “test” directory.
Conclusion
We made Basepair’s API as readable, simple, and robust as we could. A great API can help teams scale up to thousands of samples in very little time. Thanks to powerful parallel processing, we’re able to run thousands of analyses simultaneously, accumulating no time debt for additional samples.
Try the API for yourself – simply sign up for a free 14-day trial of Basepair below and setup the appropriate API.